
So far the examples have used XML Notepad to create the table of contents. Notepad++ may be a faster alternative once you have some experience with the process. And using a spreadsheet is probably the fastest of all, although not as flexible.
Notepad++
Notepad++ is a popular text editor that includes tools to work with XML files. When creating a Gloria table of contents file, the first thing you should do is set the correct character encoding for the file. From the Encoding menu select Encode in UTF-8-BOM.
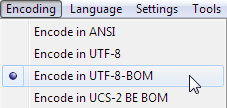
The default encoding (ANSI) will not represent accented characters correctly, nor other special Unicode characters. You can change the encoding at any time, but if you’ve already used accented characters throughout the file they will be garbled if you switch to UTF-8-BOM. In that case select Convert to UTF-8-BOM in the Encoding menu. It’s easiest to set it right at the beginning.
This is what the example file looks like in Notepad++:

It’s not the purpose of this manual to explain the inner workings of XML. If you’re interested, Google is your friend. You can find a good introduction at w3schools (https://www.w3schools.com/xml/xml_whatis.asp).
The screenshot from Notepad++ is the same file from XML Notepad shown in the previous section. However, with Notepad++ it’s faster to select an entire hymn (the portion between <hymn …> and </hymn>) and copy and paste to quickly create dozens of blank hymn elements.
If you use Notepad++, save the file (with “.xml” extension) and load it into XML Notepad anyway. XML Notepad will check the file to make sure it is properly formatted according to XML rules and notify you of any errors. Keep in mind that it will not know nor care about Gloria-specific formatting. You will need to refer to the import log file to catch any of those errors.
Saving the file from XML Notepad will rearrange the layout into a standard profile (what you see above), which can be useful to tidy up the contents of the file.
Spreadsheet
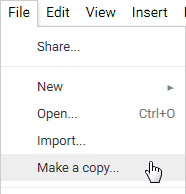
There is a Gloria table of contents spreadsheet template on Google Sheets at this link. From the File menu select Make A Copy and create your own spreadsheet from the template. You’ll be doing all the editing in your copy.
Step 1: General Info
Add some basic information about the hymnbook. The green cells are where you add or edit your data.
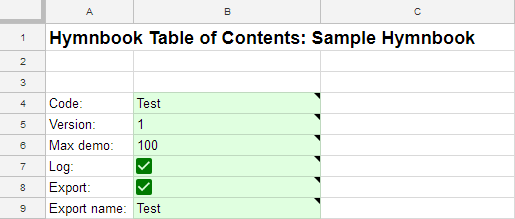
The most important field is the hymnbook code (cell B4). This is the identification code that represents the hymnbook internally in Gloria, and uniquely differentiates it from other hymnbooks. It’s value must be three or four characters. Upper or lower case ASCII letters (unaccented) and digits are accepted. The code is case sensitive: “Test”, “test” and “TEST” are all different. Typically the code is made up of the initials of your hymnbook. If you intend to distribute the hymnbook, contact Gloria Music to make sure the code you’ve chosen won’t conflict with another hymnbook.
The version field (cell B5) is a number between 0 and 9999. Start with a version number of 1 and increase the value every time you redistribute the hymnbook with modifications. The hymnbook version appears on the Gloria System Info screen in the setup menu. It’s a useful way for the user to see if they have the latest update for that hymnbook.
The max demo field (cell B6) is a number between 1 and 999. It’s the highest-numbered hymn Gloria will play while in Demo mode. It’s set to 100 in the template, which means that in Demo mode Gloria will go back to the beginning of the hymnbook after playing hymn #100. Set the value to 999 so that every hymn in the hymnbook is included in Demo mode.
Check the log checkbox (cell B7) to generate a log file with any errors or warnings encountered while importing the hymnbook into Gloria. It’s helpful to have a record of errors, especially at the beginning, to troubleshoot problems with a new hymnbook. The log file is stored on the USB memory stick in the same folder as the hymnbook XML file. It won’t be created if there are no errors at all while importing the hymnbook.
Check the export checkbox (cell B8) to create a single file containing an entire hymnbook, including the table of contents and all the MIDI files, while importing the hymnbook into Gloria. This file can then be distributed to other Gloria users. Add an export file name (cell B9) for the hymnbook export file. It’s limited to 8 characters and must conform to basic filename requirements (e.g. start with a letter, only letters and digits, no spaces or punctuation). The export file will be saved to the “Music” folder on the USB memory stick.
Step 2: Hymnbook Languages and Titles
Next, set the languages you want to use for the titles in your hymnbook. There is space for two languages in the template (columns B and C). If you only want one language, use column B and leave column C blank. If you want more than two languages contact Gloria Music for an expanded template.

Set the language codes in cells B13 and C13 according to ISO 639-1. See the Wikipedia page on ISO 639-1 for a list of language codes. If there is a title in the language selected by the user, then Gloria will display that title. If there is no matching title language, Gloria will display the first title in the list (column B). So make the first title your default title and then add additional languages as required.
Enter the hymnbook title in cells B14 and C14. This title will be displayed to the user during Gloria startup and while selecting a hymnbook from the setup menu.
Step 3: Hymn Titles
For each hymn number in column A, enter a hymn title in column B (and optionally column C) according to the languages you selected in the previous step. Place an “X” in column D for each hymn with a title.
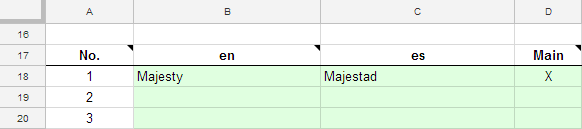
Hymn numbers can go unused. You can add titles to numbers 85, 86 and 88, and leave number 87 blank, for example.
Step 4: Hymn Info
For each hymn number in column A, enter the hymn’s properties in columns F–J.
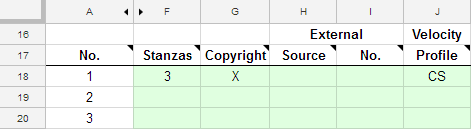
The Stanzas field (column F) is a number between 1 and 15. It’s the number of times the verse / chorus is repeated. Generally this is the number of times the main MIDI file is repeated, although the presence of a second version and / or new key MIDI file will distribute the repetition over multiple files (see File Naming Convention and Structure).
Place an “X” in the Copyright field (column G) for hymns where the music is held under copyright. You must have a license from copyright holders to distribute such music. This field helps with record-keeping and accounting for royalties. If you distribute copyright music you are responsible for securing the necessary mechanical licenses and for paying the royalties. Without licensing you may be liable for expensive infringement claims.
If the hymn is sourced from another (external) hymnbook, enter the hymnbook code of the external hymnbook in the External Source field (column H). This is the other hymnbook’s three or four character identification code. Enter the hymn number in that external hymnbook in the External No. field (column I), a value between 1 and 999. Both fields must be filled for a hymn to be taken from an external hymnbook.
Enter “CS” in the Velocity Profile field (column J) for the hymn to use a compressed dynamic range profile. Leave the field blank to use the extended dynamic range profile. “CS” is usually the best choice for music intended to accompany singing.
Step 5: Hymn Music Files
For each hymn number in column A, place an “X” in columns L–P for each MIDI file available for the hymn. At the very minimum a hymn must have a Main file. See the discussion on File Naming Convention and Structure to understand how MIDI files can be used.

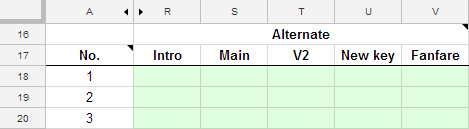
Each hymn can optionally include an alternate version. For hymns that have an alternate version place an “X” in columns R–V for each MIDI file available for the hymn.
Step 6: Create Table of Contents XML File
The spreadsheet automatically creates the correct XML code. When you’ve entered all the necessary hymnbook and hymn data in the green cells, copy the yellow cells into a Gloria table of contents file.

Copy the entire yellow section from the spreadsheet. This includes columns AA through AO and rows 15 through 1,017. The screenshot above has most of the rows and columns hidden to show the entire range in a small space. Most of the contents of the spreadsheet may be blank but copy the entire range anyway. Wait for the selected area to show a dashed line around it. It may take a few seconds depending on your internet connection speed.
Open a blank document in XML Notepad and paste the data into it.

From the File menu in XML Notepad select Save As and save the file with a filename the same as the hymnbook code (“Test” in the example above).